Junit レポーター
Jenkins互換のXMLベースのJUnitレポートを作成するWebdriverIOレポーター
インストール
最も簡単な方法は、package.jsonの中で@wdio/junit-reporterをdevDependencyとして維持することです:
npm install @wdio/junit-reporter --save-dev
WebdriverIOのインストール方法はこちらで確認できます。
出力
このレポーターは各ランナーのレポートを出力するため、各specファイルに対してxmlレポートが生成されます。以下は specファイル内の異なるシナリオに対するXML出力の例です。
単一のdescribeブロック
describe('a test suite', () => {
    it('a test case', function () {
      // do something
      // assert something
    });
});
次のようになります
<testsuites>
    <testsuite name="a test suite" timestamp="2019-04-18T13:45:21" time="11.735" tests="0" failures="0" errors="0" skipped="0">
        <properties>
          <property name="specId" value="0"/>
          <property name="suiteName" value="a test suite"/>
          <property name="capabilities" value="chrome"/>
          <property name="file" value=".\test\specs\asuite.spec.js"/>
        </properties>
        <testcase classname="chrome.a_test_case" name="a_test_suite_a_test_case" time="11.706"/>
    </testsuite>
</testsuites>
ネストされたdescribeブロック
describe('a test suite', () => {
    describe('a nested test suite', function() {
        it('a test case', function () {
          // do something
          // assert something
        });
    });
});
次のようになります
<testsuites>
    <testsuite name="a test suite" timestamp="2019-04-18T13:45:21" time="11.735" tests="0" failures="0" errors="0" skipped="0">
    <properties>
      <property name="specId" value="0"/>
      <property name="suiteName" value="a test suite"/>
      <property name="capabilities" value="chrome"/>
      <property name="file" value=".\test\specs\asuite.spec.js"/>
    </properties>
  </testsuite>
  <testsuite name="a nested test suite" timestamp="2019-04-18T13:45:21" time="11.735" tests="0" failures="0" errors="0" skipped="0">
    <properties>
      <property name="specId" value="0"/>
      <property name="suiteName" value="a nested test suite"/>
      <property name="capabilities" value="chrome"/>
      <property name="file" value=".\test\specs\asuite.spec.js"/>
    </properties>
    <testcase classname="chrome.a_test_case" name="a nested test suite a test case" time="11.706"/>
  </testsuite>
</testsuites>
複数のdescribeブロック
describe('a test suite', () => {
    it('a test case', function () {
      // do something
      // assert something
    });
});
describe('a second test suite', () => {
    it('a second test case', function () {
      // do something
      // assert something
    });
});
次のようになります
<testsuites>
    <testsuite name="a test suite" timestamp="2019-04-18T13:45:21" time="11.735" tests="0" failures="0" errors="0" skipped="0">
    <properties>
      <property name="specId" value="0"/>
      <property name="suiteName" value="a test suite"/>
      <property name="capabilities" value="chrome"/>
      <property name="file" value=".\test\specs\asuite.spec.js"/>
      <testcase classname="chrome.a_test_case" name="a nested test suite a test case" time="11.706"/>
    </properties>
  </testsuite>
  <testsuite name="a second test suite" timestamp="2019-04-18T13:45:21" time="11.735" tests="0" failures="0" errors="0" skipped="0">
    <properties>
      <property name="specId" value="0"/>
      <property name="suiteName" value="a second test suite"/>
      <property name="capabilities" value="chrome"/>
      <property name="file" value=".\test\specs\asuite.spec.js"/>
    </properties>
    <testcase classname="chrome.a_second_test_case" name="a_second_test_suite_a_second_test_case" time="11.706"/>
  </testsuite>
</testsuites>
失敗とエラー
すべてのテストケースの失敗はJUnitテストケースエラーとしてマッピングされます。アサーション失敗やエラーによる失敗したテストケースは以下のようになります:
<testcase classname="chrome.a_test_case" name="a_test_suite_a_test_case" time="0.372">
  <failure message="Error: some error"/>
    <system-err>
        <![CDATA[
Error: some assertion failure
    at UserContext.<anonymous> (C:\repo\webdriver-example\test\specs/a_test_suite.spec.js:22:17)
]]>
  </system-err>
</testcase>
設定
以下のコードはデフォルトのwdioテストランナー設定を示しています。レポーターの配�列に'junit'を追加するだけです。テスト中に出力を得るには、WDIO DotレポーターとWDIO JUnitレポーターを同時に実行することができます:
// wdio.conf.js
module.exports = {
    // ...
    reporters: [
        'dot',
        ['junit', {
            outputDir: './',
            outputFileFormat: function(options) { // optional
                return `results-${options.cid}.${options.capabilities}.xml`
            }
        }]
    ],
    // ...
};
以下のオプションがサポートされています:
outputDir
xmlファイルが保存されるディレクトリを定義します。
タイプ: String
必須
outputFileFormat
テスト実行後に作成されるxmlファイルを定義します。
タイプ: Object
デフォルト: function (opts) { return `wdio-${this.cid}-${name}-reporter.log` }
outputFileFormat: function (options) {
    return 'mycustomfilename.xml';
}
注意:
options.capabilitiesはそのランナー用の機能オブジェクトなので、文字列内に${options.capabilities}を指定すると[Object object]が返されます。ファイル名に含めたい機能のプロパティを具体的に指定する必要があります。
suiteNameFormat
テストスイート名のフォーマット(出力xmlなど)のためのカスタム正規表現を提供する機能を与えます。
タイプ: Regex,
デフォルト: /[^a-zA-Z0-9@]+/
// wdio.conf.js
module.exports = {
    // ...
    reporters: [
        'dot',
        ['junit', {
            outputDir: './',
            suiteNameFormat: /[^a-zA-Z0-9@]+/
            outputFileFormat: function(options) { // optional
                return `results-${options.cid}.${options.capabilities}.xml`
            }
        }]
    ],
    // ...
};
addFileAttribute
各テストケースにファイル属性を追加します。この設定は主にCircleCIのためのものです。この設定はより豊富な詳細を提供しますが、他のCIプラットフォームで問題を引き起こす可能性があります。
タイプ: Boolean,
デフォルト: false
packageName
'packageName'を設定することで、パッケージを追加のレベルで分けることができます。例えば、異なる環境変数を設定してテストスイートを繰り返し実行する場合:
タイプ: String
例:
// wdio.conf.js
module.exports = {
    // ...
    reporters: [
        'dot',
        ['junit', {
            outputDir: './',
            packageName: process.env.USER_ROLE // chrome.41 - administrator
        }]
    ]
    // ...
};
errorOptions
xmlエラー通知のさまざまな組み合わせを設定できます。
expect(true).toBe(false, 'my custom message')のようなJasmineテストがあると、以下のようなテストエラーが発生します:
{
    matcherName: 'toBe',
    message: 'Expected true to be false, \'my custom message\'.',
    stack: 'Error: Expected true to be false, \'my custom message\'.\n    at UserContext.it (/home/mcelotti/Workspace/WebstormProjects/forcebeatwio/test/marco/prova1.spec.js:3:22)',
    passed: false,
    expected: [ false, 'my custom message' ],
    actual: true
}
したがって、どのキーをどこで使用するかを選択できます。以下の例を参照してください。
タイプ: Object,
デフォルト: errorOptions: { error: "message" }
例:
// wdio.conf.js
module.exports = {
    // ...
    reporters: [
        'dot',
        ['junit', {
            outputDir: './',
            errorOptions: {
                error: 'message',
                failure: 'message',
                stacktrace: 'stack'
            }
        }]
    ],
    // ...
};
addWorkerLogs
オプションパラメータで、レポーターにテストからのコンソールログを添付するには、このパラメータをtrueに設定します。
タイプ: Boolean
デフォルト: false
例:
// wdio.conf.js
module.exports = {
    // ...
    reporters: [
        'dot',
        ['junit', {
            outputDir: './',
            addWorkerLogs: true
        }]
    ],
    // ...
};
テストケースにカスタムプロパティを追加する
このプラグインはaddProperty(name, value)関数を提供します。この関数は、現在実行中のテストステップに追加のjunitテストケースプロパティを追加するために使用できます。これらのプロパティは結果のxmlで<property name="${name}" value="${value}" />として報告されます。
これを使用する典型的な用途は、課題やテストケースへのリンクを追加することです。
使用例
mochaの例:
import { addProperty } from '@wdio/junit-reporter'

describe('Suite', () => {
    it('Case', () => {
        addProperty('test_case', 'TC-1234')
    })
})
Jenkinsのセットアップ
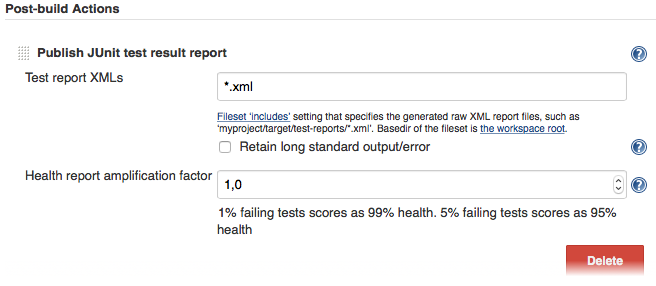
最後に、CIジョブ(例:Jenkins)にxmlファイルの場所を伝える必要があります。そのためには、テスト実行後に実行されるポストビルドアクションをジョブに追加し、Jenkins(または希望するCIシステム)にXMLテスト結果を指定します:

CIシステムにそのようなポストビルドステップがない場合は、おそらくインターネット上のどこかにプラグインがあるでしょう。
WebdriverIOの詳細についてはホームページをご覧ください。
