Junit Reporter
Reporter WebdriverIO, создающий XML-отчеты в формате JUnit, совместимые с Jenkins
Установка
Самый простой способ - держать @wdio/junit-reporter как devDependency в вашем package.json, через:
npm install @wdio/junit-reporter --save-dev
Инструкции по установке WebdriverIO можно найти здесь.
Вывод
Этот репортер будет создавать отчет для каждого запуска, таким образом, вы получите xml-отчет для каждого spec-файла. Ниже приведены примеры вывода XML для различных сценариев в spec-файлах.
Один блок describe
describe('a test suite', () => {
    it('a test case', function () {
      // do something
      // assert something
    });
});
преобразуется в
<testsuites>
    <testsuite name="a test suite" timestamp="2019-04-18T13:45:21" time="11.735" tests="0" failures="0" errors="0" skipped="0">
        <properties>
          <property name="specId" value="0"/>
          <property name="suiteName" value="a test suite"/>
          <property name="capabilities" value="chrome"/>
          <property name="file" value=".\test\specs\asuite.spec.js"/>
        </properties>
        <testcase classname="chrome.a_test_case" name="a_test_suite_a_test_case" time="11.706"/>
    </testsuite>
</testsuites>
Вложенный блок describe
describe('a test suite', () => {
    describe('a nested test suite', function() {
        it('a test case', function () {
          // do something
          // assert something
        });
    });
});
преобразуется в
<testsuites>
    <testsuite name="a test suite" timestamp="2019-04-18T13:45:21" time="11.735" tests="0" failures="0" errors="0" skipped="0">
    <properties>
      <property name="specId" value="0"/>
      <property name="suiteName" value="a test suite"/>
      <property name="capabilities" value="chrome"/>
      <property name="file" value=".\test\specs\asuite.spec.js"/>
    </properties>
  </testsuite>
  <testsuite name="a nested test suite" timestamp="2019-04-18T13:45:21" time="11.735" tests="0" failures="0" errors="0" skipped="0">
    <properties>
      <property name="specId" value="0"/>
      <property name="suiteName" value="a nested test suite"/>
      <property name="capabilities" value="chrome"/>
      <property name="file" value=".\test\specs\asuite.spec.js"/>
    </properties>
    <testcase classname="chrome.a_test_case" name="a nested test suite a test case" time="11.706"/>
  </testsuite>
</testsuites>
Множественные блоки describe
describe('a test suite', () => {
    it('a test case', function () {
      // do something
      // assert something
    });
});
describe('a second test suite', () => {
    it('a second test case', function () {
      // do something
      // assert something
    });
});
преобразуется в
<testsuites>
    <testsuite name="a test suite" timestamp="2019-04-18T13:45:21" time="11.735" tests="0" failures="0" errors="0" skipped="0">
    <properties>
      <property name="specId" value="0"/>
      <property name="suiteName" value="a test suite"/>
      <property name="capabilities" value="chrome"/>
      <property name="file" value=".\test\specs\asuite.spec.js"/>
      <testcase classname="chrome.a_test_case" name="a nested test suite a test case" time="11.706"/>
    </properties>
  </testsuite>
  <testsuite name="a second test suite" timestamp="2019-04-18T13:45:21" time="11.735" tests="0" failures="0" errors="0" skipped="0">
    <properties>
      <property name="specId" value="0"/>
      <property name="suiteName" value="a second test suite"/>
      <property name="capabilities" value="chrome"/>
      <property name="file" value=".\test\specs\asuite.spec.js"/>
    </properties>
    <testcase classname="chrome.a_second_test_case" name="a_second_test_suite_a_second_test_case" time="11.706"/>
  </testsuite>
</testsuites>
Провалы и ошибки
Все провалы тестовых случаев отображаются как ошибки тестовых случаев JUnit. Проваленный тестовый случай из-за сбоя утверждения или ошибки будет выглядеть так:
<testcase classname="chrome.a_test_case" name="a_test_suite_a_test_case" time="0.372">
  <failure message="Error: some error"/>
    <system-err>
        <![CDATA[
Error: some assertion failure
    at UserContext.<anonymous> (C:\repo\webdriver-example\test\specs/a_test_suite.spec.js:22:17)
]]>
  </system-err>
</testcase>
Конфигурация
Следующий код показывает конфигурацию тестового запуска wdio по умолчанию. Просто добавьте 'junit' как репортер
в массив. Чтобы получить вывод во время теста, вы можете запустить WDIO Dot Reporter и WDIO JUnit Reporter одновременно:
// wdio.conf.js
module.exports = {
    // ...
    reporters: [
        'dot',
        ['junit', {
            outputDir: './',
            outputFileFormat: function(options) { // optional
                return `results-${options.cid}.${options.capabilities}.xml`
            }
        }]
    ],
    // ...
};
Поддерживаются следующие опции:
outputDir
Определите директорию, где должны храниться ваши xml-файлы.
Тип: String
Обязательно
outputFileFormat
Определите xml-файлы, создаваемые после выполнения теста.
Тип: Object
По умолчанию: function (opts) { return `wdio-${this.cid}-${name}-reporter.log` }
outputFileFormat: function (options) {
    return 'mycustomfilename.xml';
}
Примечание:
options.capabilities- это объект capabilities для этого запуска, поэтому указание${options.capabilities}в строке вернет [Object object]. Необходимо указать, какие свойства capabilities вы хотите видеть в имени файла.
suiteNameFormat
Дает возможность предоставить пользовательское регулярное выражение для форматирования имени тестового набора (например, в выходном xml).
Тип: Regex,
По умолчанию: /[^a-zA-Z0-9@]+/
// wdio.conf.js
module.exports = {
    // ...
    reporters: [
        'dot',
        ['junit', {
            outputDir: './',
            suiteNameFormat: /[^a-zA-Z0-9@]+/
            outputFileFormat: function(options) { // optional
                return `results-${options.cid}.${options.capabilities}.xml`
            }
        }]
    ],
    // ...
};
addFileAttribute
Добавляет атрибут файла к каждому тестовому случаю. Эта конфигурация предназначена в основном для CircleCI. Эта настройка предоставляет более богатые детали, но может не работать на других CI-платформах.
Тип: Boolean,
По умолчанию: false
packageName
Вы можете разбить пакеты на дополнительный уровень, установив 'packageName'. Например, если вы хотите итерировать тестовый набор с различными переменными окружения:
Тип: String
Пример:
// wdio.conf.js
module.exports = {
    // ...
    reporters: [
        'dot',
        ['junit', {
            outputDir: './',
            packageName: process.env.USER_ROLE // chrome.41 - administrator
        }]
    ]
    // ...
};
errorOptions
Позволяет установить различные комбинации уведомлений об ошибках внутри xml.
Для теста Jasmine, такого как expect(true).toBe(false, 'my custom message'), вы получите эту ошибку теста:
{
    matcherName: 'toBe',
    message: 'Expected true to be false, \'my custom message\'.',
    stack: 'Error: Expected true to be false, \'my custom message\'.\n    at UserContext.it (/home/mcelotti/Workspace/WebstormProjects/forcebeatwio/test/marco/prova1.spec.js:3:22)',
    passed: false,
    expected: [ false, 'my custom message' ],
    actual: true
}
Поэтому вы можете выбрать, какой ключ будет использоваться где, см. пример ниже.
Тип: Object,
По умолчанию: errorOptions: { error: "message" }
Пример:
// wdio.conf.js
module.exports = {
    // ...
    reporters: [
        'dot',
        ['junit', {
            outputDir: './',
            errorOptions: {
                error: 'message',
                failure: 'message',
                stacktrace: 'stack'
            }
        }]
    ],
    // ...
};
addWorkerLogs
Опциональный параметр, установите этот параметр в true, чтобы прикрепить консольные логи из теста в репортере.
Тип: Boolean
По умолчанию: false
Пример:
// wdio.conf.js
module.exports = {
    // ...
    reporters: [
        'dot',
        ['junit', {
            outputDir: './',
            addWorkerLogs: true
        }]
    ],
    // ...
};
Добавление пользовательских свойств к тестовым случаям
Этот плагин предоставляет функцию addProperty(name, value). Эта �функция может использоваться для добавления дополнительных свойств тестового случая junit к текущему выполняемому тестовому шагу. Эти свойства будут отображены в получаемом xml как <property name="${name}" value="${value}" />.
Типичный случай использования - добавление ссылки на проблему или тестовый случай.
Пример использования
Пример для mocha:
import { addProperty } from '@wdio/junit-reporter'

describe('Suite', () => {
    it('Case', () => {
        addProperty('test_case', 'TC-1234')
    })
})
Настройка Jenkins
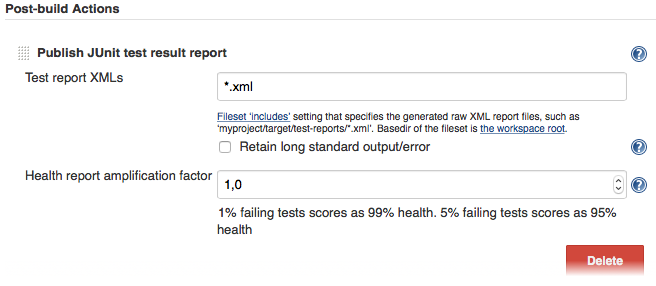
И последнее, но не менее важное: вам нужно сообщить вашей CI-системе (например, Jenkins), где она может найти xml-файл. Для этого добавьте действие post-build к вашей задаче, которое выполняется после завершения теста, и укажите Jenkins (или вашей желаемой CI-системе) на ваши XML-результаты тестов:

Если в вашей CI-системе нет такого шага post-build, вероятно, где-то в интернете есть плагин для этого.
Для получения дополнительной информации о WebdriverIO см. домашнюю страницу.
