مُسجِل Junit
مُسجِل WebdriverIO ينشئ تقارير JUnit متوافقة مع Jenkins بتنسيق XML
التثبيت
الطريقة الأسهل هي الاحتفاظ بـ @wdio/junit-reporter كتبعية تطوير في ملف package.json الخاص بك، عبر:
npm install @wdio/junit-reporter --save-dev
يمكن العثور على تعليمات حول كيفية تثبيت WebdriverIO هنا.
المخرجات
سينتج هذا المُسجِل تقريرًا لكل منفذ، وبالتالي ستتلقى تقرير xml لكل ملف spec. فيما يلي أمثلة على مخرجات XML نظرًا لسيناريوهات مختلفة في ملف المواصفات.
كتلة describe واحدة
describe('a test suite', () => {
    it('a test case', function () {
      // do something
      // assert something
    });
});
تصبح
<testsuites>
    <testsuite name="a test suite" timestamp="2019-04-18T13:45:21" time="11.735" tests="0" failures="0" errors="0" skipped="0">
        <properties>
          <property name="specId" value="0"/>
          <property name="suiteName" value="a test suite"/>
          <property name="capabilities" value="chrome"/>
          <property name="file" value=".\test\specs\asuite.spec.js"/>
        </properties>
        <testcase classname="chrome.a_test_case" name="a_test_suite_a_test_case" time="11.706"/>
    </testsuite>
</testsuites>
كتلة describe متداخلة
describe('a test suite', () => {
    describe('a nested test suite', function() {
        it('a test case', function () {
          // do something
          // assert something
        });
    });
});
تصبح
<testsuites>
    <testsuite name="a test suite" timestamp="2019-04-18T13:45:21" time="11.735" tests="0" failures="0" errors="0" skipped="0">
    <properties>
      <property name="specId" value="0"/>
      <property name="suiteName" value="a test suite"/>
      <property name="capabilities" value="chrome"/>
      <property name="file" value=".\test\specs\asuite.spec.js"/>
    </properties>
  </testsuite>
  <testsuite name="a nested test suite" timestamp="2019-04-18T13:45:21" time="11.735" tests="0" failures="0" errors="0" skipped="0">
    <properties>
      <property name="specId" value="0"/>
      <property name="suiteName" value="a nested test suite"/>
      <property name="capabilities" value="chrome"/>
      <property name="file" value=".\test\specs\asuite.spec.js"/>
    </properties>
    <testcase classname="chrome.a_test_case" name="a nested test suite a test case" time="11.706"/>
  </testsuite>
</testsuites>
كتل describe متعددة
describe('a test suite', () => {
    it('a test case', function () {
      // do something
      // assert something
    });
});
describe('a second test suite', () => {
    it('a second test case', function () {
      // do something
      // assert something
    });
});
تصبح
<testsuites>
    <testsuite name="a test suite" timestamp="2019-04-18T13:45:21" time="11.735" tests="0" failures="0" errors="0" skipped="0">
    <properties>
      <property name="specId" value="0"/>
      <property name="suiteName" value="a test suite"/>
      <property name="capabilities" value="chrome"/>
      <property name="file" value=".\test\specs\asuite.spec.js"/>
      <testcase classname="chrome.a_test_case" name="a nested test suite a test case" time="11.706"/>
    </properties>
  </testsuite>
  <testsuite name="a second test suite" timestamp="2019-04-18T13:45:21" time="11.735" tests="0" failures="0" errors="0" skipped="0">
    <properties>
      <property name="specId" value="0"/>
      <property name="suiteName" value="a second test suite"/>
      <property name="capabilities" value="chrome"/>
      <property name="file" value=".\test\specs\asuite.spec.js"/>
    </properties>
    <testcase classname="chrome.a_second_test_case" name="a_second_test_suite_a_second_test_case" time="11.706"/>
  </testsuite>
</testsuites>
الإخفاقات والأخطاء
يتم تعيين جميع إخفاقات حالة الاختبار كأخطاء حالة اختبار JUnit. ستبدو حالة الاختبار الفاشلة بسبب فشل التأكيد أو الخطأ كما يلي:
<testcase classname="chrome.a_test_case" name="a_test_suite_a_test_case" time="0.372">
  <failure message="Error: some error"/>
    <system-err>
        <![CDATA[
Error: some assertion failure
    at UserContext.<anonymous> (C:\repo\webdriver-example\test\specs/a_test_suite.spec.js:22:17)
]]>
  </system-err>
</testcase>
الإعداد
يوضح الكود التالي الإعداد الافتراضي لمشغل اختبارات wdio. ما عليك سوى إضافة 'junit' كمسجل إلى المصفوفة. للحصول على بعض المخرجات أثناء الاختبار، يمكنك تشغيل WDIO Dot Reporter و WDIO JUnit Reporter في نفس الوقت:
// wdio.conf.js
module.exports = {
    // ...
    reporters: [
        'dot',
        ['junit', {
            outputDir: './',
            outputFileFormat: function(options) { // optional
                return `results-${options.cid}.${options.capabilities}.xml`
            }
        }]
    ],
    // ...
};
الخيارات التالية مدعومة:
outputDir
تحديد دليل حيث يجب تخزين ملفات xml الخاصة بك.
النوع: String
مطلوب
outputFileFormat
تحديد ملفات xml التي يتم إنشاؤها بعد تنفيذ الاختبار.
النوع: Object
الافتراضي: function (opts) { return `wdio-${this.cid}-${name}-reporter.log` }
outputFileFormat: function (options) {
    return 'mycustomfilename.xml';
}
ملاحظة:
options.capabilitiesهي كائن القدرات الخاص بذلك المشغل، لذا فإن تحديد${options.capabilities}في السلسلة الخاصة بك سيعيد [Object object]. يجب عليك تحديد أي خصائص للقدرات تريدها في اسم الملف الخاص بك.
suiteNameFormat
يمنح القدرة على توفير regex مخصص لتنسيق اسم مجموعة الاختبار (على سبيل المثال في xml الناتج).
النوع: Regex,
الافتراضي: /[^a-zA-Z0-9@]+/
// wdio.conf.js
module.exports = {
    // ...
    reporters: [
        'dot',
        ['junit', {
            outputDir: './',
            suiteNameFormat: /[^a-zA-Z0-9@]+/
            outputFileFormat: function(options) { // optional
                return `results-${options.cid}.${options.capabilities}.xml`
            }
        }]
    ],
    // ...
};
addFileAttribute
يضيف سمة ملف لكل حالة اختبار. يهدف هذا الإعداد بشكل أساسي إلى CircleCI. يوفر هذا الإعداد تفاصيل أكثر ثراءً ولكن قد يتعطل على منصات CI أخرى.
النوع: Boolean,
الافتراضي: false
packageName
يمكنك تقسيم الحزم بمستوى إضافي عن طريق تعيين 'packageName'. على سبيل المثال، إذا كنت تريد التكرار على مجموعة اختبار مع متغير بيئة مختلف:
النوع: String
مثال:
// wdio.conf.js
module.exports = {
    // ...
    reporters: [
        'dot',
        ['junit', {
            outputDir: './',
            packageName: process.env.USER_ROLE // chrome.41 - administrator
        }]
    ]
    // ...
};
errorOptions
يسمح بتعيين مجموعات مختلفة من إشعارات الخطأ داخل xml.
بالنظر إل�ى اختبار Jasmine مثل expect(true).toBe(false, 'my custom message') ستحصل على هذا الخطأ في الاختبار:
{
    matcherName: 'toBe',
    message: 'Expected true to be false, \'my custom message\'.',
    stack: 'Error: Expected true to be false, \'my custom message\'.\n    at UserContext.it (/home/mcelotti/Workspace/WebstormProjects/forcebeatwio/test/marco/prova1.spec.js:3:22)',
    passed: false,
    expected: [ false, 'my custom message' ],
    actual: true
}
لذلك يمكنك اختيار أي مفتاح سيتم استخدامه أين، انظر المثال أدناه.
النوع: Object,
الافتراضي: errorOptions: { error: "message" }
مثال:
// wdio.conf.js
module.exports = {
    // ...
    reporters: [
        'dot',
        ['junit', {
            outputDir: './',
            errorOptions: {
                error: 'message',
                failure: 'message',
                stacktrace: 'stack'
            }
        }]
    ],
    // ...
};
addWorkerLogs
معلمة اختيارية، قم بتعيين هذه المعلمة إلى true من أجل إرفاق سجلات وحدة التحكم من الاختبار في المسجل.
النوع: Boolean
الافتراضي: false
مثال:
// wdio.conf.js
module.exports = {
    // ...
    reporters: [
        'dot',
        ['junit', {
            outputDir: './',
            addWorkerLogs: true
        }]
    ],
    // ...
};
إضافة خصائص مخصصة إلى حالات الاختبار
يوفر هذا البرنامج المساعد دالة addProperty(name, value). يمكن استخدام هذه الدالة لإضافة خصائص إضافية لحالة اختبار junit إلى خطوة الاختبار الحالية. سيتم الإبلاغ عن هذه الخصائص في ملف xml الناتج بتنسيق <property name="${name}" value="${value}" />.
حالة الاستخدام النموذجية لهذا هي إضافة رابط إلى مشكلة أو حالة اختبار.
مثال الاستخدام
مثال لـ mocha:
import { addProperty } from '@wdio/junit-reporter'

describe('Suite', () => {
    it('Case', () => {
        addProperty('test_case', 'TC-1234')
    })
})
إعداد Jenkins
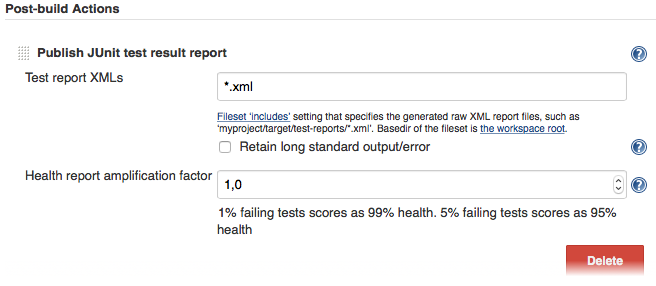
أخيرًا وليس آخرًا، تحتاج إلى إخبار وظيفة CI الخاصة بك (مثل Jenkins) أين يمكنها العثور على ملف xml. للقيام بذلك، أضف إجراء ما بعد البناء إلى وظيفتك يتم تنفيذه بعد تشغيل الاختبار وقم بتوجيه Jenkins (أو نظام CI المرغوب فيه) إلى نتائج اختبار XML الخاصة بك:

إذا لم تكن هناك خطوة ما بعد البناء في نظام CI الخاص بك، فمن المحتمل أن يكون هناك برنامج مساعد لذلك في مكان ما على الإنترنت.
لمزيد من المعلومات حول WebdriverIO، راجع الصفحة الرئيسية.
