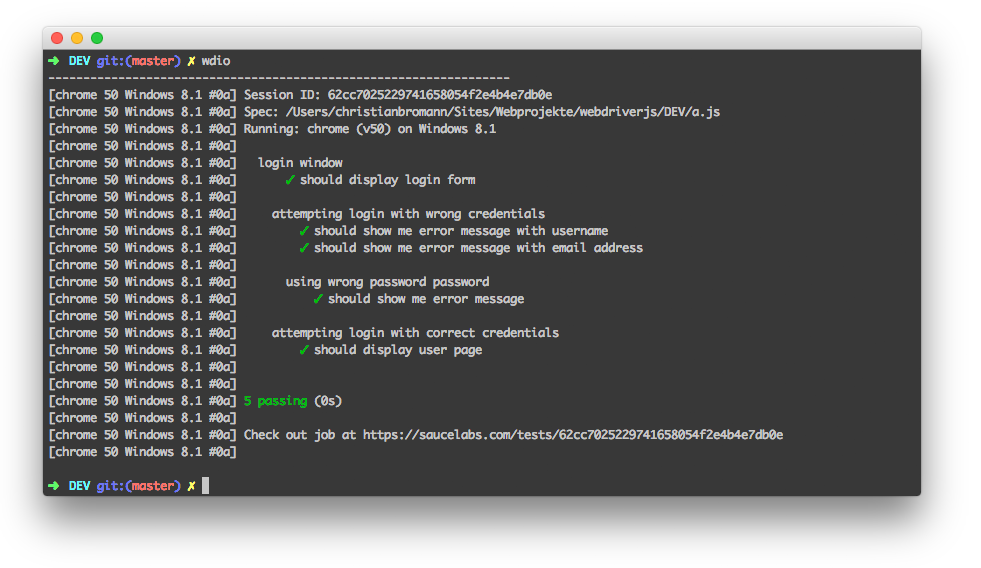
Reporter Spec
Un plugin WebdriverIO per generare report in stile spec.

Installazione
Il modo più semplice è mantenere @wdio/spec-reporter come devDependency nel tuo package.json, tramite:
npm install @wdio/spec-reporter --save-dev
Le istruzioni su come installare WebdriverIO possono essere trovate qui.
Configurazione
Il seguente codice mostra la configurazione predefinita del test runner wdio. Basta aggiungere 'spec' come reporter all'array.
// wdio.conf.js
module.exports = {
  // ...
  reporters: ['dot', 'spec'],
  // ...
};
Opzioni del Reporter Spec
symbols
Fornisci simboli personalizzati per i test passed, failed e/o skipped
Tipo: object
Predefinito: {passed: '✓', skipped: '-', failed: '✖'}
Esempio
[
  "spec",
  {
    symbols: {
      passed: '[PASS]',
      failed: '[FAIL]',
    },
  },
]
sauceLabsSharableLinks
Per impostazione predefinita, i risultati dei test in Sauce Labs possono essere visualizzati solo da un membro dello stesso team, non da un membro di un team diverso. Questa opzione abiliterà link condivisibili per impostazione predefinita, il che significa che tutti i test eseguiti in Sauce Labs possono essere visualizzati da chiunque.
Basta aggiungere sauceLabsSharableLinks: false, come mostrato di seguito, nelle opzioni del reporter per disabilitare questa funzionalità.
Tipo: boolean
Predefinito: true
Esempio
[
  "spec",
  {
    sauceLabsSharableLinks: false,
  },
]
onlyFailures
Stampa solo i risultati delle specifiche fallite.
Tipo: boolean
Predefinito: false
Esempio
[
  "spec",
  {
    onlyFailures: true,
  },
]
addConsoleLogs
Imposta a true per mostrare i log della console dai passaggi nel report finale
Tipo: boolean
Predefinito: false
[
  "spec",
  {
    addConsoleLogs: true,
  },
]
realtimeReporting
Imposta a true per visualizzare lo stato del test in tempo reale anziché solo alla fine dell'esecuzione
Tipo: boolean
Predefinito: false
[
  "spec",
  {
    realtimeReporting: true,
  },
]
showPreface
Imposta a false per disabilitare il prefisso [ MutliRemoteBrowser ... ] nei report.
Tipo: boolean
Predefinito: true
[
  "spec",
  {
    showPreface: false,
  },
]
Quando impostato su false vedrai l'output come:
Running: loremipsum (v50) on Windows 10
Session ID: foobar

» /foo/bar/loo.e2e.js
Foo test
   green ✓ foo
   green ✓ bar

» /bar/foo/loo.e2e.js
Bar test
   green ✓ some test
   red ✖ a failed test
   red ✖ a failed test with no stack
e con true (predefinito) ogni riga sarà preceduta dal prefisso:
[loremipsum 50 Windows 10 #0-0] Running: loremipsum (v50) on Windows 10
[loremipsum 50 Windows 10 #0-0] Session ID: foobar
[loremipsum 50 Windows 10 #0-0]
[loremipsum 50 Windows 10 #0-0] » /foo/bar/loo.e2e.js
[loremipsum 50 Windows 10 #0-0] Foo test
[loremipsum 50 Windows 10 #0-0]    green ✓ foo
[loremipsum 50 Windows 10 #0-0]    green ✓ bar
[loremipsum 50 Windows 10 #0-0]
[loremipsum 50 Windows 10 #0-0] » /bar/foo/loo.e2e.js
[loremipsum 50 Windows 10 #0-0] Bar test
[loremipsum 50 Windows 10 #0-0]    green ✓ some test
[loremipsum 50 Windows 10 #0-0]    red ✖ a failed test
[loremipsum 50 Windows 10 #0-0]    red ✖ a failed test with no stack
[loremipsum 50 Windows 10 #0-0]
color
Imposta a true per visualizzare l'output colorato nel terminale
Tipo: boolean
Predefinito: true
[
  "spec",
  {
    color: true,
  },
]
Opzioni dell'ambiente
Ci sono alcune opzioni che puoi impostare tramite variabili d'ambiente:
FORCE_COLOR
Se impostato a true, ad esempio tramite FORCE_COLOR=0 npx wdio run wdio.conf.js, tutti i colori del terminale saranno disabilitati.
