फ्रेमवर्क्स
WebdriverIO Runner मे�ं Mocha, Jasmine, और Cucumber.js का बिल्ट-इन समर्थन है। आप इसे तृतीय-पक्ष ओपन-सोर्स फ्रेमवर्क्स, जैसे Serenity/JS के साथ भी एकीकृत कर सकते हैं।
WebdriverIO को टेस्ट फ्रेमवर्क के साथ एकीकृत करने के लिए, आपको NPM पर उपलब्ध एक एडेप्टर पैकेज की आवश्यकता होती है। ध्यान दें कि एडेप्टर पैकेज को वहीं स्थापित किया जाना चाहिए जहां WebdriverIO स्थापित है। इसलिए, अगर आपने WebdriverIO को ग्लोबली स्थापित कि�या है, तो सुनिश्चित करें कि एडेप्टर पैकेज भी ग्लोबली स्थापित है।
WebdriverIO को टेस्ट फ्रेमवर्क के साथ एकीकृत करने से आप अपने स्पेक फाइल्स या स्टेप डेफिनिशन्स में ग्लोबल browser वेरिएबल का उपयोग करके WebDriver इंस्टेंस तक पहुंच सकते हैं।
ध्यान दें कि WebdriverIO सेलेनियम सत्र को शुरू और समाप्त करने की भी देखभाल करेगा, इसलिए आपको इसे स्वयं करने की आवश्यकता नहीं है।
Mocha का उपयोग
सबसे पहले, NPM से एडेप्टर पैकेज स्थापित करें:
- npm
- Yarn
- pnpm
- Bun
npm install @wdio/mocha-framework --save-dev
yarn add @wdio/mocha-framework --dev
pnpm add @wdio/mocha-framework --save-dev
bun add @wdio/mocha-framework --dev
डिफ़ॉल्ट रूप से WebdriverIO एक अशूरन लाइब्रेरी प्रदान करता है जो बिल्ट-इन है जिसे आप तुरंत शुरू कर सकते हैं:
describe('my awesome website', () => {
    it('should do some assertions', async () => {
        await browser.url('https://webdriver.io')
        await expect(browser).toHaveTitle('WebdriverIO · Next-gen browser and mobile automation test framework for Node.js | WebdriverIO')
    })
})
WebdriverIO Mocha के BDD (डिफ़ॉल्ट), TDD, और QUnit इंटरफेसेस का समर्थन करता है।
यदि आप अपने स्पेक्स को TDD शैली में लिखना चाहते हैं, तो अपने mochaOpts कॉन्फिग में ui प्रॉपर्टी को tdd पर सेट करें। अब आपकी टेस्ट फाइलें इस तरह लिखी जानी चाहिए:
suite('my awesome website', () => {
    test('should do some assertions', async () => {
        await browser.url('https://webdriver.io')
        await expect(browser).toHaveTitle('WebdriverIO · Next-gen browser and mobile automation test framework for Node.js | WebdriverIO')
    })
})
यदि आप अन्य Mocha-विशिष्ट सेटिंग्स को परिभाषित करना चाहते हैं, तो आप इसे अपनी कॉन्फिगरेशन फाइल में mochaOpts कुंजी के साथ कर सकते हैं। सभी विकल्पों की सूची Mocha प्रोजेक्ट वेबसाइट पर पाई जा सकती है।
नोट: WebdriverIO Mocha में done कॉलबैक्स के पुराने उपयोग का समर्थन नहीं करता है:
it('should test something', (done) => {
    done() // throws "done is not a function"
})
Mocha विकल्प
निम्नलिखित विकल्पों को आपके wdio.conf.js में अपने Mocha वातावरण को कॉन्फिगर करने के लिए लागू किया जा सकता है। नोट: सभी विकल्पों का समर्थन नहीं है, उदाहरण के लिए, parallel विकल्प लागू करने से एक त्रुटि होगी क्योंकि WDIO टेस्टरनर के पास पैरेलल में टेस्ट चलाने का अपना तरीका है। आप इन फ्रेमवर्क विकल्पों को आर्गुमेंट्स के रूप में पास कर सकते हैं, उदाहरण के लिए:
wdio run wdio.conf.ts --mochaOpts.grep "my test" --mochaOpts.bail --no-mochaOpts.checkLeaks
यह निम्नलिखित Mocha विकल्पों को पास करेगा:
{
    grep: ['my-test'],
    bail: true
    checkLeacks: false
}
निम्नलिखित Mocha विकल्पों का समर्थन किया गया है:
require
require विकल्प तब उपयोगी होता है जब आप कुछ बुनियादी कार्यक्षमता जोड़ना या बढ़ाना चाहते हैं (WebdriverIO फ्रेमवर्क विकल्प)।
प्रकार: string|string[]
डिफ़ॉल्ट: []
compilers
फाइलों को कंपाइल करने के लिए दिए गए मॉड्यूल(ओं) का उपयोग करें। कंप�ाइलर्स को आवश्यकताओं से पहले शामिल किया जाएगा (WebdriverIO फ्रेमवर्क विकल्प)।
प्रकार: string[]
डिफ़ॉल्ट: []
allowUncaught
अनकॉट त्रुटियों को प्रोपेगेट करें।
प्रकार: boolean
डिफ़ॉल्ट: false
bail
पहले टेस्ट विफलता के बाद बेल करें।
प्रकार: boolean
डिफ़ॉल्ट: false
checkLeaks
ग्लोबल वेरिएबल लीक्स के लिए जांच करें।
प्रकार: boolean
डिफ़ॉल्ट: false
delay
रूट सूट एक्ज़ीक्यूशन में देरी करें।
प�्रकार: boolean
डिफ़ॉल्ट: false
fgrep
दिए गए स्ट्रिंग के टेस्ट फिल्टर।
प्रकार: string
डिफ़ॉल्ट: null
forbidOnly
only के रूप में मार्क किए गए टेस्ट सूट को विफल करते हैं।
प्रकार: boolean
डिफ़ॉल्ट: false
forbidPending
पेंडिंग टेस्ट सूट को विफल करते हैं।
प्रकार: boolean
डिफ़ॉल्ट: false
fullTrace
विफलता पर पूर्ण स्टैकट्रेस।
प्रकार: boolean
डिफ़ॉल्ट: false
global
ग्लोबल स्कोप में अपेक्षित वेरिएबल्स।
प्रकार: string[]
डिफ़ॉल्ट: []
grep
दिए गए रेगुलर एक्सप्रेशन के टेस्ट फिल्टर।
प्रकार: RegExp|string
डिफ़ॉल्ट: null
invert
टेस्ट फिल्टर मैचेस को इनवर्ट करें।
प्रकार: boolean
डिफ़ॉल्ट: false
retries
विफल टेस्ट को रिट्राई करने की संख्या।
प्रकार: number
डिफ़ॉल्ट: 0
timeout
टाइमआउ�ट थ्रेशोल्ड वैल्यू (ms में)।
प्रकार: number
डिफ़ॉल्ट: 30000
Jasmine का उपयोग
सबसे पहले, NPM से एडेप्टर पैकेज स्थापित करें:
- npm
- Yarn
- pnpm
- Bun
npm install @wdio/jasmine-framework --save-dev
yarn add @wdio/jasmine-framework --dev
pnpm add @wdio/jasmine-framework --save-dev
bun add @wdio/jasmine-framework --dev
फिर आप अपने कॉन्फिग में jasmineOpts प्रॉपर्टी सेट करके अपने Jasmine वातावरण को कॉन्फिगर कर सकते हैं। सभी विकल्पों की सूची Jasmine प्रोजेक्ट वेबसाइट पर पाई जा सकती है।
Jasmine विकल्प
निम्नलिखित विकल्पों को आपके wdio.conf.js में jasmineOpts प्रॉपर्टी का उपयोग करके अपने Jasmine वातावरण को कॉन्फिगर करने के लिए लागू किया जा सकता है। इन कॉन्फिगरेशन विकल्पों के बारे में अधिक जानकारी के लिए, Jasmine डॉक्स देखें। आप इन फ्रेमवर्क विकल्पों को आर्गुमेंट्स के रूप में पास कर सकते हैं, उदाहरण के लिए:
wdio run wdio.conf.ts --jasmineOpts.grep "my test" --jasmineOpts.failSpecWithNoExpectations --no-jasmineOpts.random
यह निम्नलिखित Mocha विकल्पों को पास करेगा:
{
    grep: ['my-test'],
    bail: true
    checkLeacks: false
}
निम्नलिखित Jasmine विकल्पों का समर्थन किया गया है:
defaultTimeoutInterval
Jasmine ऑपरेशन्स के लिए डिफ़ॉल्ट टाइमआउट इंटरवल।
प्रकार: number
�डिफ़ॉल्ट: 60000
helpers
jasmine स्पेक्स से पहले शामिल करने के लिए spec_dir के सापेक्ष फाइलपाथ्स (और ग्लोब्स) की सरणी।
प्रकार: string[]
डिफ़ॉल्ट: []
requires
requires विकल्प तब उपयोगी होता है जब आप कुछ बुनियादी कार्यक्षमता जोड़ना या बढ़ाना चाहते हैं।
प्रकार: string[]
डिफ़ॉल्ट: []
random
स्पेक एक्ज़ीक्यूशन ऑर्डर को रैंडमाइज़ करें या नहीं।
प्रकार: boolean
डिफ़ॉल्ट: true
seed
रैंडमाइजेशन के आधार के रूप ��में उपयोग करने के लिए सीड। नल होने पर सीड को एक्ज़ीक्यूशन के शुरू में यादृच्छिक रूप से निर्धारित किया जाता है।
प्रकार: Function
डिफ़ॉल्ट: null
failSpecWithNoExpectations
अगर स्पेक कोई expectations नहीं चलाया है तो उसे विफल करें या नहीं। डिफ़ॉल्ट रूप से एक स्पेक जिसने कोई expectations नहीं चलाया है, उसे पास के रूप में रिपोर्ट किया जाता है। इसे true पर सेट करने से ऐसे स्पेक को विफलता के रूप में रिपोर्ट किया जाएगा।
प्रकार: boolean
डिफ़ॉल्ट: false
oneFailurePerSpec
स्पेक्स को केवल एक expectation विफलता होने का कारण बनें या नहीं।
प्रकार: boolean
डिफ़ॉल्ट: false
specFilter
स्पेक्स को फिल्टर करने के लिए उपयोग करने का फंक्शन।
प्रकार: Function
डिफ़ॉल्ट: (spec) => true
grep
केवल इस स्ट्रिंग या रेगएक्सप से मिलते टेस्ट चलाएं। (केवल तभी लागू होता है जब कोई कस्टम specFilter फंक्शन सेट नहीं है)
प्रकार: string|Regexp
डिफ़ॉल्ट: null
invertGrep
अगर true है तो यह मैचिंग टेस्ट को इनवर्ट करता है और केवल उन टेस्ट को चलाता है जो grep में उपयोग किए गए एक्सप्रेशन से मेल नहीं खाते। (केवल तभी लागू होता है जब कोई कस्टम specFilter फंक्शन सेट नहीं है)
प्रकार: boolean
डिफ़ॉल्ट: false
Cucumber का उपयोग
सबसे पहले, NPM से एडेप्टर पैकेज स्थापित करें:
- npm
- Yarn
- pnpm
- Bun
npm install @wdio/cucumber-framework --save-dev
yarn add @wdio/cucumber-framework --dev
pnpm add @wdio/cucumber-framework --save-dev
bun add @wdio/cucumber-framework --dev
यदि आप Cucumber का उपयोग करना चाहते हैं, तो कॉन्फिग फाइल में framework: 'cucumber' जोड़कर framework प्रॉपर्टी को cucumber पर सेट करें।
Cucumber के लिए विकल्प कॉन्फिग फाइल में cucumberOpts के साथ दिए जा सकते हैं। विकल्पों की पूरी सूची यहां देखें।
Cucumber के साथ जल्दी शुरू करने के लिए, हमारे cucumber-boilerplate प्रोजेक्ट पर एक नज़र डालें जिसमें आपको शुरू करने के लिए आवश्यक सभी स्टेप डेफिनिशन्स हैं, और आप तुरंत फीचर फाइल लिखना शुरू कर देंगे।
Cucumber विकल्प
निम्नलिखित विकल्पों को आपके wdio.conf.js में cucumberOpts प्रॉपर्टी का उपयोग करके अपने Cucumber वातावरण को कॉन्फिगर करने के लिए लागू किया जा सकता है:
टेस्ट को फिल्टर करने के लिए कस्टम tags जैसे cucumberOpts को कमांड लाइन के माध्यम से निर्दिष्ट किया जा सकता है। यह cucumberOpts.{optionName}="value" प्रारूप का उपयोग करके पूरा किया जाता है।
उदाहरण के लिए, यदि आप केवल उन टेस्ट को चलाना चाहते हैं जिन्हें @smoke टैग किया गया है, तो आप निम्न कमांड का उपयोग कर सकते हैं:
# जब आप केवल उन टेस्ट को चलाना चाहते हैं जिनमें "@smoke" टैग है
npx wdio run ./wdio.conf.js --cucumberOpts.tags="@smoke"
npx wdio run ./wdio.conf.js --cucumberOpts.name="some scenario name" --cucumberOpts.failFast
यह कमांड cucumberOpts में tags विकल्प को @smoke पर सेट करता है, यह सुनिश्चित करता है कि केवल इस टैग वाले टे�स्ट ही निष्पादित किए जाते हैं।
backtrace
त्रुटियों के लिए पूर्ण बैकट्रेस दिखाएं।
प्रकार: Boolean
डिफ़ॉल्ट: true
requireModule
किसी भी सपोर्ट फाइल की आवश्यकता से पहले मॉड्यूल की आवश्यकता है।
प्रकार: string[]
डिफ़ॉल्ट: []
उदाहरण:
cucumberOpts: {
    requireModule: ['@babel/register']
    // या
    requireModule: [
        [
            '@babel/register',
            {
                rootMode: 'upward',
                ignore: ['node_modules']
            }
        ]
    ]
 }
failFast
पहली विफलता पर रन को समाप्त करें।
प्रकार: boolean
डिफ़ॉल्ट: false
name
केवल एक्सप्रेशन से मेल खाने वाले नामों के �साथ सिनारियो निष्पादित करें (दोहराने योग्य)।
प्रकार: RegExp[]
डिफ़ॉल्ट: []
require
फीचर्स को निष्पादित करने से पहले आपकी स्टेप डेफिनिशन्स वाली फाइलों की आवश्यकता है। आप अपने स्टेप डेफिनिशन्स के लिए एक ग्लोब भी निर्दिष्ट कर सकते हैं।
प्रकार: string[]
डिफ़ॉल्ट: []
उदाहरण:
cucumberOpts: {
    require: [path.join(__dirname, 'step-definitions', 'my-steps.js')]
}
import
जहां आपका सपोर्ट कोड है, वहां के पाथ, ESM के लिए।
प्रकार: String[]
डिफ़ॉल्ट: []
उदाहरण:
cucumberOpts: {
    import: [path.join(__dirname, 'step-definitions', 'my-steps.js')]
}
strict
अगर कोई अपरिभाषित या पेंडिंग स्टेप्स हैं तो विफल होें।
प्रकार: boolean
डिफ़ॉल्ट: false
tags
केवल टैग्स एक्सप्रेशन से मैच करने वाले फीचर्स या सीनेरियोस को निष्पादित करें। अधिक जानकारी के लिए कृपया Cucumber डॉक्युमेंटेशन देखें।
प्रकार: String
डिफ़ॉल्ट: ``
timeout
स्टेप डेफिनिशन्स के लिए मिलीसेकंड्स में टाइमआउट।
प्रकार: Number
डिफ़ॉल्ट: 30000
retry
विफल टेस्ट केसेस को रिट्राई करने की संख्या निर्दिष्ट करें।
प्रकार: Number
डिफ़ॉल्ट: 0
retryTagFilter
केवल टैग्स एक्सप्रेशन से मैच करने वाले फीचर्स या सीनेरियोस को रिट्�राई करता है (दोहराने योग्य)। इस विकल्प के लिए '--retry' का निर्दिष्ट होना आवश्यक है।
प्रकार: RegExp
language
आपकी फीचर फाइलों के लिए डिफ़ॉल्ट भाषा
प्रकार: String
डिफ़ॉल्ट: en
order
परिभाषित / यादृच्छिक क्रम में टेस्ट चलाएं
प्रकार: String
डिफ़ॉल्ट: defined
format
फॉर्मैटर का नाम और आउटपुट फाइल पाथ जिसका उपयोग करना है। WebdriverIO मुख्य रूप से केवल उन फॉर्मैटर्स का समर्थन करता है जो आउटपुट को एक फाइल में लिखते हैं।
प्रकार: string[]
formatOptions
फॉर्मैटर्स को प्रदान किए जाने वाले विकल्प
प्रकार: object
tagsInTitle
फीचर या सीनेरियो नाम में cucumber टैग्स जोड़ें
प्रकार: Boolean
डिफ़ॉल्ट: false
कृपया ध्यान दें कि यह एक @wdio/cucumber-framework विशिष्ट विकल्प है और cucumber-js द्वारा स्वयं मान्यता प्राप्त नहीं है
ignoreUndefinedDefinitions
अपरिभाषित परिभाषाओं को चेतावनियों के रूप में व्यवहार करें।
प्रकार: Boolean
डिफ़ॉल्ट: false
कृपया ध्यान दें कि यह एक @wdio/cucumber-framework विशिष्ट विकल्प है और cucumber-js द्वारा स्वयं मान्य��ता प्राप्त नहीं है
failAmbiguousDefinitions
अस्पष्ट परिभाषाओं को त्रुटियों के रूप में व्यवहार करें।
प्रकार: Boolean
डिफ़ॉल्ट: false
कृपया ध्यान दें कि यह एक @wdio/cucumber-framework विशिष्ट विकल्प है और cucumber-js द्वारा स्वयं मान्यता प्राप्त नहीं है
tagExpression
केवल टैग एक्सप्रेशन से मैच करने वाले फीचर्स या सीनेरियोस को निष्पादित करें। अधिक जानकारी के लिए कृपया Cucumber डॉक्युमेंटेशन देखें।
प्रकार: String
डिफ़ॉल्ट: ``
कृपया ध्यान दें कि यह विकल्प भविष्य में पुराना हो जाएगा। इसके बजाय tags कॉन्फ��िग प्रॉपर्टी का उपयोग करें
profile
उपयोग करने के लिए प्रोफाइल निर्दिष्ट करें।
प्रकार: string[]
डिफ़ॉल्ट: []
कृपया ध्यान दें कि प्रोफाइल के भीतर केवल विशिष्ट मूल्यों (worldParameters, name, retryTagFilter) का समर्थन किया जाता है, क्योंकि cucumberOpts प्राथमिकता लेता है। इसके अतिरिक्त, प्रोफाइल का उपयोग करते समय, सुनिश्चित करें कि उल्लिखित मूल्य cucumberOpts के भीतर घोषित नहीं किए गए हैं।
cucumber में टेस्ट स्किप करना
ध्यान दें कि यदि आप cucumberOpts में उपलब्ध नियमित cucumber टेस्ट फिल्टरिंग क्षमताओं का उपयोग करके एक टे��स्ट स्किप करना चाहते हैं, तो आप इसे क्षमताओं में कॉन्फिगर किए गए सभी ब्राउज़र और उपकरणों के लिए करेंगे। विशिष्ट क्षमताओं संयोजनों के लिए सीनेरियोस को स्किप करने में सक्षम होने के लिए यदि आवश्यक न हो तो सत्र शुरू किए बिना, webdriverio cucumber के लिए निम्नलिखित विशिष्ट टैग सिंटैक्स प्रदान करता है:
@skip([condition])
जहां condition एक वैकल्पिक संयोजन है क्षमताओं गुणों के साथ उनके मूल्यों के साथ जो जब सभी मिले तो टैग किए गए सीनेरियो या फीचर को स्किप कर दिया जाएगा। बेशक आप विभिन्न स्थितियों में टेस्ट को स्किप करने के लिए सीनेरियोस और फीचर्स के लिए कई टैग जोड़ सकते हैं।
आप `tagExpression' को बदले बिना टेस्ट स्किप करने के लिए '@skip' एनोटेशन का भी उपयोग कर सकते हैं। इस मामले में स्किप किए गए टेस्ट टेस्ट रिपोर्ट में प्रदर्शित किए जाएंगे।
इस सिंटैक्स के कुछ उदाहरण यहां हैं:
@skipया@skip(): हमेशा टैग किए गए आइटम को स्किप करेगा@skip(browserName="chrome"): chrome ब्राउज़र्स के खिलाफ टेस्ट निष्पादित नहीं किया जाएगा।@skip(browserName="firefox";platformName="linux"): linux निष्पादनों पर firefox में टेस्ट स्किप करेगा।@skip(browserName=["chrome","firefox"]): टैग किए गए आइटम chrome और firefox ब्राउज़र्स दोनों के लिए स्किप किए जाएंगे।@skip(browserName=/i.*explorer/): regexp से मेल खाने वाले ब्राउज़र्स के साथ क्षमताएं स्किप की जाएंगी (जैसेiexplorer,internet explorer,internet-explorer, ...)।
इम्पोर्ट स्टेप डेफिनिशन हेल्पर
Given, When या Then या हुक्स जैसे स्टेप डेफिनिशन हेल्पर का उपयोग करने के लिए, आपको उन्हें @cucumber/cucumber से इम्पोर्ट करना होगा, उदाहरण के लिए इस तरह:
import { Given, When, Then } from '@cucumber/cucumber'
अब, यदि आप पहले से ही Cucumber का उपयोग WebdriverIO से असंबंधित अन्य प्रकार के टेस्ट के लिए करते हैं जिसके लिए आप एक विशिष्ट संस्करण का उपयोग करते हैं, तो आपको WebdriverIO Cucumber पैकेज से अपने e2e टेस्ट में इन हेल्पर्स को इम्पोर्ट करने की आवश्यकता है, उद�ाहरण के लिए:
import { Given, When, Then, world, context } from '@wdio/cucumber-framework'
यह सुनिश्चित करता है कि आप WebdriverIO फ्रेमवर्क के भीतर सही हेल्पर्स का उपयोग करते हैं और आपको अन्य प्रकार के परीक्षण के लिए एक स्वतंत्र Cucumber संस्करण का उपयोग करने की अनुमति देता है।
पब्लिशिंग रिपोर्ट
Cucumber आपके टेस्ट रन रिपोर्ट को https://reports.cucumber.io/ पर पब्लिश करने की सुविधा प्रदान करता है, जिसे या तो cucumberOpts में publish फ्लैग सेट करके या CUCUMBER_PUBLISH_TOKEN एनवायरनमेंट वेरिएबल को कॉन्फिगर करके नियंत्रित किया जा सकता है। हालांकि, जब आप टेस्ट एक्ज़ीक्यूशन के लिए WebdriverIO का उपयोग करते हैं, तो इस दृष्टिकोण के साथ एक सीमा है। यह प्रत्येक फीचर फाइल के लिए अलग से रिपोर्ट अपडेट करता है, जिससे एक समेकित रिपोर्ट देखना मुश्किल हो जाता है।
इस सीमा को दूर करने के लिए, हमने @wdio/cucumber-framework के भीतर publishCucumberReport नामक एक प्रोमिस-आधारित मेथड पेश किया है। इस मेथड को onComplete हुक में कॉल किया जाना चाहिए, जो इसे कॉल करने का सबसे अनुकूल स�्थान है। publishCucumberReport को रिपोर्ट डायरेक्टरी का इनपुट आवश्यक है जहां cucumber मैसेज रिपोर्ट स्टोर की गई हैं।
आप अपने cucumberOpts में format विकल्प को कॉन्फिगर करके cucumber message रिपोर्ट जनरेट कर सकते हैं। रिपोर्ट के ओवरराइटिंग को रोकने और यह सुनिश्चित करने के लिए कि प्रत्येक टेस्ट रन सटीक रूप से रिकॉर्ड किया गया है, cucumber message फॉर्मेट विकल्प के भीतर एक डायनामिक फाइल नाम प्रदान करना अत्यधिक अनुशंसित है।
इस फंक्शन का उपयोग करने से पहले, निम्न एनवायरनमेंट वेरिएबल सेट करना सुनिश्चित करें:
- CUCUMBER_PUBLISH_REPORT_URL: URL जहां आप Cucumber रिपोर्ट पब्लिश करना चाहते हैं। यदि प्रदान नहीं किया गया है, तो डिफ़ॉल्ट URL 'https://messages.cucumber.io/api/reports' का उपयोग किया जाएगा।
- CUCUMBER_PUBLISH_REPORT_TOKEN: रिपोर्ट पब्लिश करने के लिए आवश्यक ऑथराइजेशन टोकन। यदि यह टोकन सेट नहीं है, तो फंक्शन रिपोर्ट पब्लिश किए बिना बाहर निकल जाएगा।
कार्यान्वयन के लिए आवश्यक कॉन्फिगरेशन्स और कोड सैंपल का एक उदाहरण यहां दिया गया है:
import { v4 as uuidv4 } from 'uuid'
import { publishCucumberReport } from '@wdio/cucumber-framework';

export const config = {
    // ... अन्य कॉन्फिगरेशन विकल्प
    cucumberOpts: {
        // ... Cucumber विकल्प कॉन्फिगरेशन
        format: [
            ['message', `./reports/${uuidv4()}.ndjson`],
            ['json', './reports/test-report.json']
        ]
    },
    async onComplete() {
        await publishCucumberReport('./reports');
    }
}
कृपया ध्यान दें कि ./reports/ वह डायरेक्टरी है जहां cucumber message रिपोर्ट स्टोर की जाएंगी।
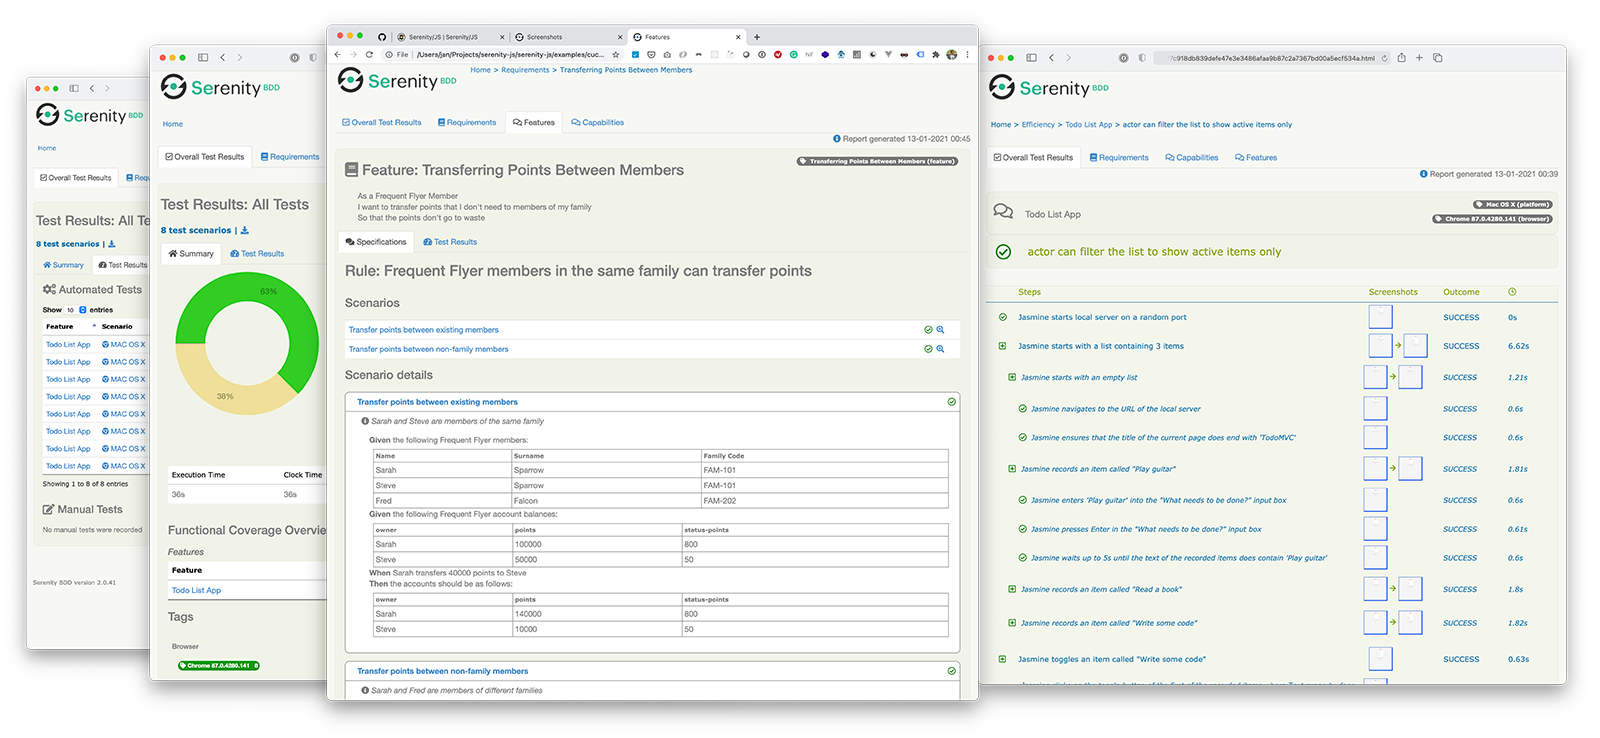
Serenity/JS का उपयोग
Serenity/JS एक ओपन-सोर्स फ्रेमवर्क है जिसे जटिल सॉफ्टवेयर सिस्टम के स्वीकृति और रिग्रेशन परीक्षण को तेज, अधिक सहयोगी, और स्केल करने में आसान बनाने के लिए डिज़ाइन किया गया है।
WebdriverIO टेस्ट सूट्स के लिए, Serenity/JS प्रदान करता है:
- एन्हांस्ड रिपोर्टिंग - आप Serenity/JS का उपयोग किसी भी बिल्ट-इन WebdriverIO फ्रेमवर्क के ड्रॉप-इन रिप्लेसमेंट के रूप में कर सकते हैं ताकि अपने प्रोजेक्ट के गहन टेस्ट एक्ज़ीक्यूशन रिपोर्ट्स और लिविंग डॉक्युमेंटेशन प्रोड्यूस कर सकें।
- स्क्रीनप्ले पैटर्न APIs - अपने टेस्ट कोड को पोर्टेबल और प्रोजेक्ट्स और टीम्स के बीच पुन: प्रयोज्य बनाने के लिए, Serenity/JS आपको नेटिव WebdriverIO APIs के ऊपर एक वैकल्पिक एब्स्ट्रैक्शन लेयर देता है।
- इंटीग्रेशन लाइब्रेरीज - स्क्रीनप्ले पैटर्न का पालन करने वाले टेस्ट सूट्स के लिए, Serenity/JS वैकल्पिक इंटीग्रेशन लाइब्रेरीज भी प्रदान करता है जो आपको API टेस्ट लिखने, लोकल सर्वर्स मैनेज करने, असर्शन्स करने और बहुत कुछ में मदद करता है!
Serenity/JS इंस्टॉल करना
एक मौजूदा WebdriverIO प्रोजेक्ट में Serenity/JS जोड़ने के लिए, NPM से निम्नलिखित Serenity/JS मॉड्यूल्स इंस्टॉल करें:
- npm
- Yarn
- pnpm
- Bun
npm install @serenity-js/{core,web,webdriverio,assertions,console-reporter,serenity-bdd} --save-dev
yarn add @serenity-js/{core,web,webdriverio,assertions,console-reporter,serenity-bdd} --dev
pnpm add @serenity-js/{core,web,webdriverio,assertions,console-reporter,serenity-bdd} --save-dev
bun add @serenity-js/{core,web,webdriverio,assertions,console-reporter,serenity-bdd} --dev
Serenity/JS मॉड्यूल्स के बारे में अधिक जानें:
@serenity-js/core@serenity-js/web@serenity-js/webdriverio@serenity-js/assertions@serenity-js/console-reporter@serenity-js/serenity-bdd
Serenity/JS कॉन्फिगर करना
Serenity/JS के साथ इंटीग्रेशन सक्षम करने के लिए, WebdriverIO को निम्नानुसार कॉन्फिगर करें:
- TypeScript
- JavaScript
import { WebdriverIOConfig } from '@serenity-js/webdriverio';

export const config: WebdriverIOConfig = {

    // WebdriverIO को Serenity/JS फ्रेमवर्क का उपयोग करने के लिए बताएं
    framework: '@serenity-js/webdriverio',

    // Serenity/JS कॉन्फिगरेशन
    serenity: {
        // अपने टेस्ट रनर के लिए उपयुक्त एडेप्टर का उपयोग करने के लिए Serenity/JS को कॉन्फिगर करें
        runner: 'cucumber',
        // runner: 'mocha',
        // runner: 'jasmine',

        // Serenity/JS रिपोर्टिंग सर्विसेज रजिस्टर करें, जिसे "स्टेज क्रू" भी कहा जाता है
        crew: [
            // वैकल्पिक, स्टैंडर्ड आउटपुट पर टेस्ट एक्ज़ीक्यूशन रिजल्ट्स प्रिंट करें
            '@serenity-js/console-reporter',

            // वैकल्पिक, Serenity BDD रिपोर्ट्स और लिविंग डॉक्युमेंटेशन (HTML) प्रोड्यूस करें
            '@serenity-js/serenity-bdd',
            [ '@serenity-js/core:ArtifactArchiver', { outputDirectory: 'target/site/serenity' } ],

            // वैकल्पिक, इंटरैक्शन विफलता पर स्वचालित रूप से स्क्रीनशॉट कैप्चर करें
            [ '@serenity-js/web:Photographer', { strategy: 'TakePhotosOfFailures' } ],
        ]
    },

    // अपने Cucumber रनर को कॉन्फिगर करें
    cucumberOpts: {
        // नीचे Cucumber कॉन्फिगरेशन विकल्प देखें
    },


    // ... या Jasmine रनर
    jasmineOpts: {
        // नीचे Jasmine कॉन्फिगरेशन विकल्प देखें
    },

    // ... या Mocha रनर
    mochaOpts: {
        // नीचे Mocha कॉन्फिगरेशन विकल्प देखें
    },

    runner: 'local',

    // कोई अन्य WebdriverIO कॉन्फिगरेशन
};
export const config = {

    // WebdriverIO को Serenity/JS फ्रेमवर्क का उपयोग करने के लिए बताएं
    framework: '@serenity-js/webdriverio',

    // Serenity/JS कॉन्फिगरेशन
    serenity: {
        // अपने टेस्ट रनर के लिए उपयुक्त एडेप्टर का उपयोग करने के लिए Serenity/JS को कॉन्फिगर करें
        runner: 'cucumber',
        // runner: 'mocha',
        // runner: 'jasmine',

        // Serenity/JS रिपोर्टिंग सर्विसेज रजिस्टर करें, जिसे "स्टेज क्रू" भी कहा जाता है
        crew: [
            '@serenity-js/console-reporter',
            '@serenity-js/serenity-bdd',
            [ '@serenity-js/core:ArtifactArchiver', { outputDirectory: 'target/site/serenity' } ],
            [ '@serenity-js/web:Photographer', { strategy: 'TakePhotosOfFailures' } ],
        ]
    },

    // अपने Cucumber रनर को कॉन्फिगर करें
    cucumberOpts: {
        // नीचे Cucumber कॉन्फिगरेशन विकल्प देखें
    },


    // ... या Jasmine रनर
    jasmineOpts: {
        // नीचे Jasmine कॉन्फिगरेशन विकल्प देखें
    },

    // ... या Mocha रनर
    mochaOpts: {
        // नीचे Mocha कॉन्फिगरेशन विकल्प देखें
    },

    runner: 'local',

    // कोई अन्य WebdriverIO कॉन्फिगरेशन
};
इनके बारे में अधिक जानें:
- Serenity/JS Cucumber कॉन्फिगरेशन विकल्प
- Serenity/JS Jasmine कॉन्फिगरेशन विकल्प
- Serenity/JS Mocha कॉन्फिगरेशन विकल्प
- WebdriverIO कॉन्फिगरेशन फाइल
Serenity BDD रिपोर्ट्स और लिविंग डॉक्युमेंटेशन प्रोड्यूस करना
Serenity BDD रिपोर्ट्स और लिविंग डॉक्युमेंटेशन Serenity BDD CLI द्वारा जनरेट किए जाते हैं, जो @serenity-js/serenity-bdd मॉड्यूल द्वारा डाउनलोड और मैनेज किया जाने वाला एक Java प्रोग्राम है।
Serenity BDD रिपोर्ट्स प्रोड्यूस करने के लिए, आपके टेस्ट सूट को अवश्य:
- Serenity BDD CLI डाउनलोड करना होगा,
serenity-bdd updateकॉल करके जो CLIjarको लोकली कैश करता है - इंटरमीडिएट Serenity BDD
.jsonरिपोर्ट्स प्रोड्यूस करना होगा, कॉन्फिगरेशन निर्देशों के अनुसारSerenityBDDReporterरजिस्टर करके - जब आप रिपोर्ट प्रोड्यूस करना चाहते हैं, तब Serenity BDD CLI �को इनवोक करना होगा,
serenity-bdd runकॉल करके
सभी Serenity/JS प्रोजेक्ट टेम्पलेट्स द्वारा उपयोग किया गया पैटर्न निम्न के उपयोग पर निर्भर करता है:
- Serenity BDD CLI डाउनलोड करने के लिए एक
postinstallNPM स्क्रिप्ट - रिपोर्टिंग प्रोसेस चलाने के लिए
npm-failsafe, भले ही टेस्ट सूट स्वयं विफल हो गया हो (जो ठीक तब है जब आपको सबसे अधिक टेस्ट रिपोर्ट्स की आवश्यकता होती है...) rimrafपिछले रन से बचे किसी भी टेस्ट रिपोर्ट को हटाने के लिए एक सुविधा विधि के रूप में
{
  "scripts": {
    "postinstall": "serenity-bdd update",
    "clean": "rimraf target",
    "test": "failsafe clean test:execute test:report",
    "test:execute": "wdio wdio.conf.ts",
    "test:report": "serenity-bdd run"
  }
}
SerenityBDDReporter के बारे में अधिक जानने के लिए, कृपया देखें:
@serenity-js/serenity-bddडॉक्युमेंटेशन में इंस्टॉलेशन निर्देश,SerenityBDDReporterAPI डॉक्स में कॉन्फिगरेशन उदाहरण,- GitHub पर Serenity/JS उदाहरण।
Serenity/JS स्क्रीनप्ले पैटर्न APIs का उपयोग
स्क्रीनप्ले पैटर्न उच्च-गुणवत्ता वाले स्वचालित स्वीकृति परीक्षण लिखने के लिए एक नवीन, उपयोगकर्ता-केंद्रित दृष्टिकोण है। यह आपको अमूर्तता की प्रभावी परतों का उपयोग करने की ओर मार्गदर्शन करता है, आपके टेस्ट सिनारियो को आपके डोमेन के व्यावसायिक शब्दजाल को कैप्चर करने में मदद करता है, और आपकी टीम पर अच्छे परीक्षण और सॉफ्टवेयर इंजीनियरिंग आदतों को प्रोत्साहित करता है।
डिफ़ॉल्ट रूप से, जब आप अपने WebdriverIO framework के रूप में @serenity-js/webdriverio रजिस्टर करते हैं, Serenity/JS एक्टर्स के डिफ़ॉल्ट कास्ट को कॉन्फिगर करता है, जहां हर एक्टर कर सकता है:
यह मौजूदा टेस्ट सूट में भी स्क्रीनप्ले पैटर्न का पालन करने वाले टेस्ट सिनारियो परिचय में आपकी मदद करने के लिए पर्याप्त होना चाहिए, उदाहरण के लिए:
import { actorCalled } from '@serenity-js/core'
import { Navigate, Page } from '@serenity-js/web'
import { Ensure, equals } from '@serenity-js/assertions'

describe('My awesome website', () => {
    it('can have test scenarios that follow the Screenplay Pattern', async () => {
        await actorCalled('Alice').attemptsTo(
            Navigate.to(`https://webdriver.io`),
            Ensure.that(
                Page.current().title(),
                equals(`WebdriverIO · Next-gen browser and mobile automation test framework for Node.js | WebdriverIO`)
            ),
        )
    })

    it('can have non-Screenplay scenarios too', async () => {
        await browser.url('https://webdriver.io')
        await expect(browser)
            .toHaveTitle('WebdriverIO · Next-gen browser and mobile automation test framework for Node.js | WebdriverIO')
    })
})
स्क्रीनप्ले पैटर्न के बारे में अधिक जानने के लिए, देखें:
